Six easy yard and home renovation jobs you can knock over in a weekend

If you have a few days to yourself over the break and there are some DIY jobs that have been nagging at you, here are some easy home maintenance and renovation tasks that you can knock off in the space of a weekend.
For many of us, the list of things to do around the house is never-ending, and as soon as one job is knocked over, something else will be in need of attention. While there are some jobs that demand an immediate fix – a busted hot water system, for example – there are other smaller ones that can end up in the too-hard basket, and stay there for a long time.
Completing those little jobs around the house can come with a tremendous sense of satisfaction, and feeling that you’ve achieved something with your day and earned that reward at the end of it all. That’s not to mention how good it feels to look out over your nice neat yard or a problem area of the house you’ve just fixed and think “yep, I did that”.
If you have time off over the break and there are parts of the house that are looking a bit shabby, or perhaps jobs that you’ve been putting off, here are some easy small- and medium-sized home renovation and DIY projects that can be knocked over in a day or two, and the estimated costs of the items you’ll need:
- Laying down fresh turf in your yard
- Laying down weed matting
- Mulching your garden beds
- Painting your fence
- Laying down landscaping rocks
- Fixing your fly screens
To work out estimated costs, Canstar checked prices on items by two major hardware retail chains offering online ordering to Australian residents, and selected the cheapest price available for any given item. Keep in mind that when purchasing items such as fly screens and weed matting, you will need to measure carefully and buy a product that is the appropriate size, and when purchasing mulch and landscaping rocks, you may also be guided by aesthetics and personal preference. Price estimates are correct at the time of writing.
1. Laying down fresh turf
If your grass is looking a bit patchy and run down, you can give your yard a lift by installing some fresh turf. Depending on the size of your yard and how large a section you want to cover, this can be a big or small job, but if you only have a few square meters or a particular section to do, then laying down turf is a job that could easily be tackled solo, or with the help of a friend.
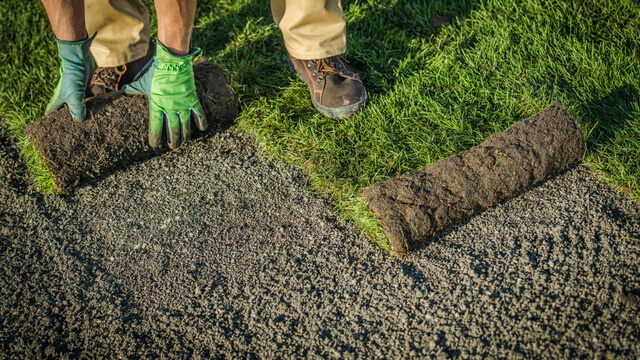
To get this job done, you’ll need bags of topsoil and wetting agent, as well as squares of turf. Depending on the size of the project, it is often possible to purchase individual squares of turf from hardware stores or garden centres; for larger projects you can also have it delivered from a turf company. It’s also important to do some research on the type of turf that will thrive in your yard, as different kinds of grass do well in different conditions, with factors including sunlight potentially influencing your choice.
Precisely measure the area you need to cover, and when purchasing turf, it may be a good idea to grab a little extra, just in case. Bunnings advises that when it comes time to lay the turf, you’ll want to start by raking the area to make sure it’s free of debris, then laying down a layer of topsoil, and making sure it is flat and evenly distributed. Then, sprinkle your wetting agent evenly over the soil, followed by fertiliser, following the bag instructions, then wet the area down with a hose.
After all the preparation is done, it’s time to lay your turf, being careful not to kneel on it or stretch it. Lay the squares of turf by hand in a tessellated brick pattern, and put the pieces as close together as you can without gaps, so they fit. You can use shears or secateurs to cut pieces of turf to size, and save any offcuts to fill gaps.
Caring for your turf after you install it is also important. Once the turf is in, water your lawn, and then after that, continue watering every day for the first four to six weeks, to encourage root growth and ensure your new turf survives.
What are the costs of turf?
What you’ll need to lay down new turf:
- grass (starting from $7.30 per 0.5 sqm slab)
- topsoil (starting from $7.98 per 25L bag)
- wetting agent (starting from $11.28 for 500mL)
- fertiliser (about $10.49 for 5kg)
- rake (starting from $9.85)
- shovel (starting from $9.98)
- secateurs (from $9.98).
These costs are estimates based on general research. Exact pricing may vary.
2. Laying down weed matting
If weeds are troubling you in your garden beds, then laying down some weed matting can be a solution to stop the pesky little blighters from springing up and ensure that your edges look nice and neat. Depending on the size of your yard, this is generally a quick job to knock over. To do it, you’ll need weed matting, metal pegs and something to hammer them into the ground. Bags of pegs never seem to go as far as you think they will, so if in doubt, it can be better to grab an extra one just in case.
First, you’ll want to measure the area of your garden beds to determine how much weed matting you’ll need to buy. Clear the area of any existing mulch or debris, and then remove any weeds that are present, being as thorough as possible. Your patience for this might vary, but personally, I find weeding to be an extremely relaxing job, as it’s a nice way to focus the mind while listening to music or a podcast, and it’s deeply satisfying to pull troublesome weeds up by their roots. Make sure the area is as clear as possible, then it’s time to lay down the mats.
To do this, you’ll simply need to roll out your weed matting to cover the desired area, and then trim any edges with scissors. Rather than laying down one long strip of weed matting, you may wish to cut the matting into smaller pieces, in order to fit it around existing trees and plants in your garden bed. To fix it in place, you’ll need to place pegs at regular intervals around the mat and hammer it into the ground. You’ll need to be careful if the soil is too hard, as this can cause metal pegs to bend and become useless.
After laying your weed matting down, the ideal next step is to conceal it by covering the area with mulch, which is covered in a separate section below.
What are the costs of weed matting?
What you’ll need to lay down weed matting:
- weed matting (starting from $19.99per roll)
- pegs (starting from $7.45 per bag)
- scissors (starting from $4.98)
- hammer (starting from $5.75).
These costs are estimates based on general research. Exact pricing may vary.
3. Mulching your garden beds
Mulch has a number of benefits – it can reduce the growth of weeds in your garden beds, help the soil retain moisture, and help regulate the soil’s temperature. In addition to being beneficial for the ground and the plants, a fresh layer of mulch can give your yard an aesthetic lift and make your edges look neater and tidier.
If you plan on laying down new mulch, it is a good idea to measure your garden beds first. Most bags of mulch will give an indication of how much area they cover – for example, a 70L bag of mulch might cover 2.5 square metres. Using these rough measurements, you can purchase as many bags as needed to cover the required area, plus a few extras, to account for any spillages or patches that might need touching up.
If you want to control weeds, then before laying down mulch in your garden beds, it may first be wise to put down a layer of weed matting, or even several layers of newspaper. Once this is done, you will then be able to lay your mulch down. Depending on the size of the job, you might do this by hand straight from the bag, or you might decide to pour your mulch out into a wheelbarrow, then spread it around with a shovel.
Jim’s Mowing cautions that when applying mulch, it is important to lay just enough to stop sunlight from reaching the garden bed underneath, but not so much that it might invite pests to come and nest there. Likewise, if there are trees or plants in your garden bed, it is important to make sure that you don’t pile mulch around their bases, as this can once again invite pests, and lead to disease.
Mulch won’t last forever – organic mulch is typically made up of materials like shredded bark and wood, and will decay into the ground over time. For this reason, Jim’s Mowing recommends reapplying organic mulch around once a year, and if possible, digging the old mulch into the surrounding soil before putting a fresh batch on top.
What are the costs to mulch garden beds?
What you’ll need to mulch your garden beds:
- bags of mulch (prices vary depending on brand and type – starting at $5 for 30L)
- rake (starting from $9.85)
- shovel (starting from $9.98)
- wheelbarrow (starting from $58.00).
These costs are estimates based on general research. Exact pricing may vary.
4. Painting and repairing your fence
If you’re anything like me, freshening the fence with a coat of paint is a job that’s easy to put off indefinitely. Depending on the size of your fence and how far it stretches around your block, this job could take a few days, but if you only want to repaint one section, then it’s a DIY task that could be knocked over relatively quickly.

Before starting out, have a look for any palings that might have come loose or nails that are sticking out. You might be able to fix these problems with a hammer and some fresh nails, or if the job is more extensive, you may need to find a placement fence paling and have it cut to size. Before painting, it is also important to give the fence a good wash, to get rid of any dirt so you’ll have a clean surface to work with. Likewise, clear any weeds or grass that have grown around the base of the fence, to make sure you have complete access to it.
When it comes time to paint your fence, it is important to measure it to get an idea of how much area you need to cover, both front and back if necessary. You may wish to match the existing colour of your paint, or choose a new colour – either way, most major hardware stores will be able to assist you in finding a type and colour of paint that suits.
Once you get started, you’ll require some foam paint rollers, a selection of brushes – including foam rollers and some smaller ones for finer details and touch-ups in hard to reach places – and a drip tray that you can pour your paint into while working on different sections of the fence.
What are the costs of painting a fence?
What you’ll need to paint your fence:
- outdoor paint (prices vary depending on brand and type, starting from $16 for 500mL)
- pack of touch-up brushes (starting from $5.30)
- foam paint roller set including a drip tray (starting from $10.00).
These costs are estimates based on general research. Exact pricing may vary.
5. Laying down landscaping rocks
Laying down landscaping rocks can be a great way to give your yard a visual lift, and transform a patch of dirt or disused area. In addition to the aesthetic appeal, landscaping rocks can be a nice low-maintenance way to prevent the growth of weeds, if installed with care. There are many different types of landscaping rocks, from basic gravel to fancier river pebbles, and they come in a variety of shades.
Before installing them, measure the area to get a precise idea of the volume of rocks you’ll need to purchase. Most bags of landscaping rocks will tell you how many square meters they cover. Pull any weeds in the area, and make sure you remove them by the root, to discourage regrowth. You may wish to dig out an area of your yard to lay them, digging down as deep as the layer of stones you plan to lay so they can sit flush with the ground.
You could put down a layer of underlay such as weed matting or newspaper to discourage further weed growth, and then lay your rocks on top of it. After pouring your rocks out, give them a visual inspection to make sure they’re laying evenly, and smooth them out with a rake if necessary, then rinse them with a hose to clean them off and get them looking nice and neat. Landscaping rocks can be a feature for the yard, and can also be used to control weeds in carports or areas of dirt under the house.
What are the costs of landscaping rocks?
What you’ll need to lay down landscaping rocks:
- bags of landscaping rocks (about $35 for a 20kg bag)
- rake (about $9.85)
- shovel (about $9.98).
These costs are estimates based on general research. Exact pricing may vary.
6. Fixing fly screens
If the fly screens on your windows are looking a bit ragged and holes are starting to appear in them, replacing them with new ones is easier than you might think. To tackle the job, you’ll first need to measure the window frames carefully, then purchase rolls of fiberglass fly screen that are big enough to allow for some overlap. You’ll need to get yourself a spline roller (which is the fancy technical name of the little pizza cutter-looking thing you use for the edges) and rolls of spline, and you’ll need a screwdriver and a pair of scissors on hand.
According to Bunnings, first of all, you’ll need to remove your screens and take them to a flat surface where you can work. Use your screwdriver to ply out the old spline, and when enough of it is loose, you should be able to pull it out of the frame, then remove the old fly screen. Next, lay your new fly screen over the frame, allowing for plenty of overlap. Lay your spline down across the gap, and then use the spline roller to push it down firmly into place, to secure the screen. When doing this part of the job, you can secure the corners of the fly screen to the metal frame using some reusable adhesive to ensure it won’t move too far (I went with Blu Tack).
Finally, you’ll need to carefully trim off the excess spline, as well as the excess fly screen around the edges, leaving approximately 5mm. Then you just need to replace the screens in your windows and you’ll have them looking neat and refreshed and doing the job they’re meant to.
What are the costs of fixing fly screens?
What you’ll need to fix your fly screens:
- fibreglass fly screens (starting from $11.50 per roll)
- spline roller (starting from $3.00)
- spline (starting from $4.10)
- screwdriver (starting from $5.99)
- scissors (starting from $4.98).
These costs are estimates based on general research. Exact pricing may vary.


 Owner occupied
20% min deposit
Redraw facility
Owner occupied
10% min deposit
Redraw facility
Owner occupied
20% min deposit
Redraw facility
Owner occupied
50% min deposit
Redraw facility
Owner occupied
20% min deposit
Redraw facility
Owner occupied
10% min deposit
Redraw facility
Owner occupied
20% min deposit
Redraw facility
Owner occupied
50% min deposit
Redraw facility


Cover image source: Faces Portrait/Shutterstock.com

This article was reviewed by our Sub Editor Jacqueline Belesky before it was updated, as part of our fact-checking process.
 24/7 claims
New for old
24/7 claims
New for old
Try our Home Insurance comparison tool to instantly compare Canstar expert rated options.